|
The Xentara EtherCAT Driver v1.3.2
User Manual
|
|
The Xentara EtherCAT Driver v1.3.2
User Manual
|
The Xentara EtherCAT Model File Generator is a command-line application that automates the process of creating Xentara EtherCAT Skill Elements in model file. It supports both online and offline modes by either connecting directly to EtherCAT terminals via ethernet cable or using an ENI (EtherCAT Network Information) XML file. This application produces the configuration file that contains the Xentara EtherCAT Skill Elements based on the specified EtherCAT setup.
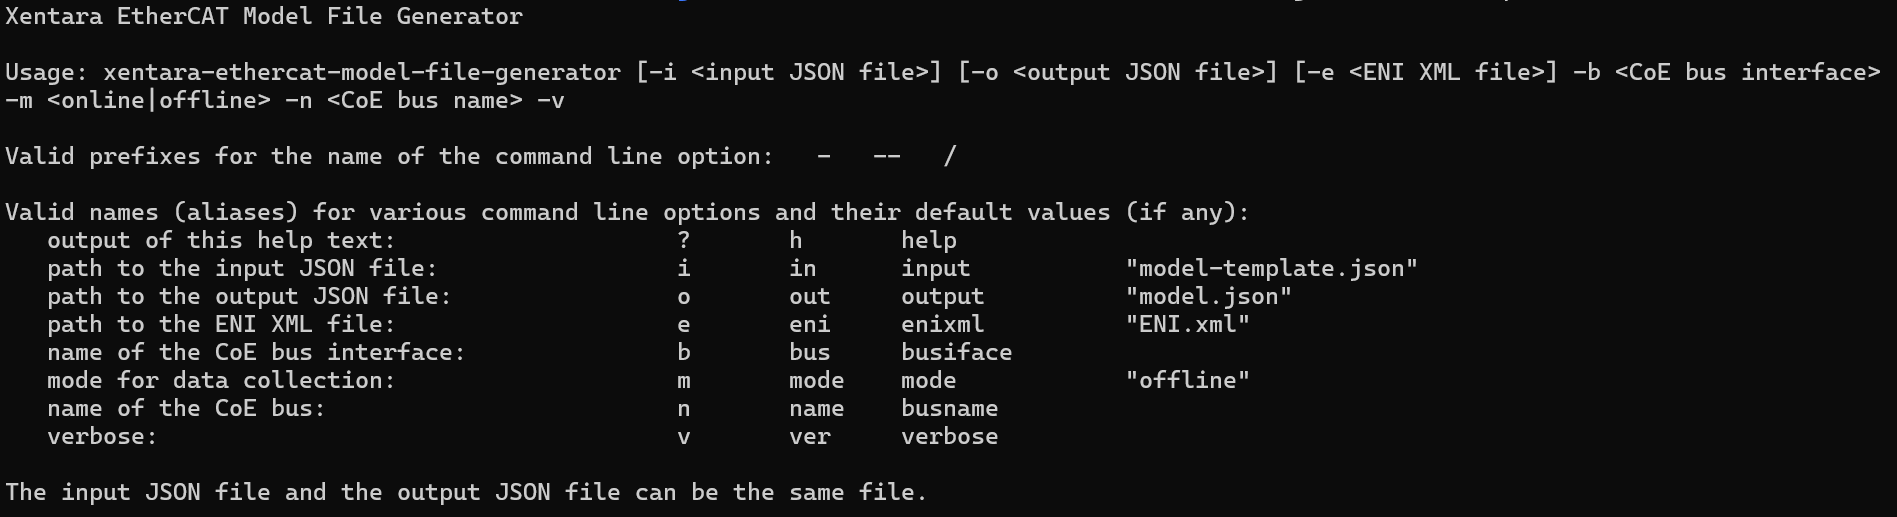
To execute the Xentara EtherCAT Model File Generator, use the following syntax:
The following are the primary command-line arguments and options for configuring the application:
| -h | Displays the help information for the command. |
| -i | Specifies the path to the input JSON file, serving as a base configuration template. The default name of the file is model-template.json. If this option is not specified, the application will check for existing model-template.json file in the directory from where application is executed. If no model-template.json file is found, error will be thrown. |
| -o | Defines the path for the output JSON file to save the generated configuration. By default, the file is named model.json. If this option is not specified, the application will check for existing model.json file in the directory from where application is executed. If no model.json file is found, it will be created in the same directory. |
| -e | Defines the path for the ENI.XML file to generate the configuration. By default, the file is named ENI.xml. If this option is not specified, the application will check for ENI.xml file in the directory from where application is executed. If no ENI.xml file is found, error will be thrown. |
| -b | Specifies the CoE (CANopen over EtherCAT) bus interface. |
| -m | Sets the mode for data collection: online to connect directly to EtherCAT terminal or offline to use the ENI file. The default mode is offline. |
| -n | Specifies the name of the Xentara EtherCAT element bus. This name is also used to find the position in the model-template.json file or input file. The information about the identifier syntax to be used in model-template.json file is mentioned below. For the online mode, it is necessary to provide the name using this flag. In offline mode, the name is optional. If this flag is not provided in offline mode, the name is picked up from the ENI.XML file. |
| -v | Enables verbose output, providing additional information during execution. This only works in case of online mode. For offline mode, the flag is ignored. |
An identifier with the following syntax is used to locate the position in the input file (model-template.json) where the Xentara EtherCAT elements will be added. Replace <Bus Name> with the name of the EtherCAT bus you've defined using the -n flag.
For example:
In this example, #CoE.Bus:My EtherCAT Bus and #CoE.Bus:Device 1 (EtherCAT) acts as the identifiers for the Xentara EtherCAT elements. "My EtherCAT Bus" and "Device 1 (EtherCAT)" are the names of the two different EtherCAT buses. This tells the application to insert the necessary EtherCAT configurations at this specific location.
In offline mode, the application requires an ENI XML file to generate the configuration.
This command will create a Xentara EtherCAT skills elements by converting the configuration from the ENI XML file. The name of the Bus will be will be taken from the ENI file. You can also provide a specific name by using a -n flag along with the desired name. The value of "eth0" will be set for configuration parameter interface in the Xentara EtherCAT Bus. It will read the template.json as the input JSON file. This file must include an identifier matching the bus name specified in the ENI file or with the -n flag. The identifier should be in the format #CoE.Bus:<BUS NAME> to indicate where the Skill elements should be added. The elements are created, added in to the identifier position and the generated output is written to the model.json.
In online mode, the application has to be connected directly to the EtherCAT terminals.
This command will create a Xentara EtherCAT skills elements by discovering the EtherCAT setup directly by connection to the devices on interface eth0. The name of the Bus will be "My EtherCAT Bus". It will read the template.json as the input JSON file. This file must include an identifier matching the bus name specified with the -n flag. In this case, it is "My EtherCAT Bus". The identifier should be in the format #CoE.Bus:My EtherCAT Bus to indicate where the Skill elements should be added. The elements are created, added in to the identifier position and the generated output is written to the model.json.